
Fixed Wheel And Singlespeed Frequently Asked Questions
Welcome to our FAQ. Using your road or mountain bike as a fixed or singlespeed is really easy and well worth a try. If you are unsure of anything please email and we will be happy to help. Please have a look at the pictures on the shop and gallery pages that help illustrate the information below. Do please ask first if you wish to reproduce any of this information on your website or otherwise.
For other FAQs and fixed or singlespeed websites please see the links page.
With thanks to the late, great Sheldon Brown who kindly granted permission to publish links to his site in 2007.
Disclaimer: Dislike these things but we have to state this: The advice and opinions that follow are provided for information purposes only and this information is used at your own risk. VeloSolo cannot be held responsible for any damage, claims or mishaps that may occur by following the information given here.
1. What is a fixed wheel bike?
2. Why ride a fixed wheel?
3. Fixed, off-road?! Are you mad?!
4. Why choose bolt on cogs over normal track hubs and screw on cogs?
5. What are the advantages of a VeloSolo bolt-on cog?
6. How does the bolt-on cog work?
7. So why do you sell traditional threaded cogs as well?!
1. Can I use a fixed wheel on my road/track bike?
2. What if my road frame was designed around gears?
3. My single speed mountain bike has track dropouts, horizontal dropouts or sliding dropouts. Can I run it 'fixed'?
4. My singlespeed mountain bike has vertical dropouts and I use a chain tensioner. Can I run it 'fixed'?
5. If not, is there any way around this?
6. How about if I am using traditional threaded track hubs and cogs?
7. I'm not interested in fixed, I just want a 'normal' single speed - how do I convert my bike?
1. Which (drilled cog) hub/set-up is best for my singlespeed road/track bike?
2. Which (drilled cog) hub/set-up is best for my mountain bike?
3. Tell me more about chainline.
4. So what will my chainline be if using a cog mounted on a disc hub?
5. How do I adjust my chainline then?
6. Tell me more about frame spacing.
7. Tell me more about wheel dishing.
8. Tell me about the various types of drop-outs.
9. Use a Shimano hub?! On my fixie?!
10. Do all normal threaded track hubs and cogs have the same chainline?
11. Any tips for installing traditional threaded cogs on track hubs?
12. Left-hand drive - what's that all about?
13. Can I use the bolt-on cogs for a double-fixed (Surly 'Dingle' style) set-up?
1. Do I have to fit a rear brake?
2. If I mount a cog on my disc mount how do I use my rear disc brake?
3. Can I use a QR on a fixed wheel?
4. Can I use a 1/8" chain with a 3/32" cog?
5. What is a magic gear?
6. Is using a cog on a disc mount a good idea?
7. How about using a front mountain bike hub on the rear of a road bike?
8. How do I fit a solid axle and spacers?
9. How do I fit the cog to my disc hub?
10. Which bolts should I buy to secure the cog to the hub?
11. Tell me about singlespeed tensioners.
12. What is a (chain) half-link?
13. How do I know what BCD my chainring is?
14. Why do chainrings need different length bolts?
15. Tell me about bottom brackets, tapers and BB lengths.
16. Any advice on gear ratios and chainring/cog sizes?
17. How do I fit bars to quill stems without scratching them?
18. Tell me about the various handlebar and stem sizes.
19. Which brake lever fits which bar?
20. 'Cog'??! You mean 'sprocket', right??!
21. What is 'Boost'?
a) General fixed wheel questions:
1. What is a fixed wheel bike?
On a 'normal' bike a freewheel is fitted that allows the rear wheel to turn without the pedals turning. On a fixed wheel the cog is 'fixed' to the rear hub. If the wheel is turning the pedals will too (and your legs).

2. Why ride a fixed wheel?
We all know the benefits of riding a singlespeed - simplicity, minimal maintenance and weight, smoothness, a near silent transmission but mostly that wonderful feeling that comes from being freed of gears. Big hill? - push harder. Fast downhill? - spin faster. You are in control.
A fixed wheel takes it to the next level with the ultimate link between you and the bike, a wonderful feeling of connection that comes no other way. You learn to ride with real smoothness and control, the rear wheel always turning like a flywheel, driving you along. Many never go back...
3. Fixed, off-road?! Are you mad?!
Hmmm, well, are you the sort who gave singlespeeding a go and a few rides later never looked back? Geared bike relegated to the back of the shed? Niche it up a bit more - fixed off-road is a challenge at times but all the more fun and rewarding for it. Give it a go...
4. Why choose bolt on cogs over normal track hubs and screw on cogs?
Good question. Threaded cogs have been around for years and many people use them without any problems whatsoever. However, search the 'fixed/singlespeed' section on any popular bike forum (try bikeforums.net or roadbike review forums) and you will find reports of damage to cogs or threads if not done up tight enough or too tight. Seized cogs, worn threads, incompatibility problems etc - many of these issues especially caused by the use of cheap cogs or incorrect installation.
Modern trends create further strains on components - off road fixed riding with low gears, urban riders doing skids and skip stops or equipment abusing tricks.
Time trialists and riders on the velodrome once up to speed simply sit and spin (with lots of power) but they don't impart sudden extreme braking forces and unusual abuse in the way some urban and off-road riders do.
Securing a cog and lockring onto a threaded aluminium hub takes care in use. The VeloSolo disc mount cog simply offers an alternative for those unhappy with traditional threaded cogs.
Most threaded track hubs are only available in 120mm spacing. The Disc cog easily mounts to any MTB rear disc hub allowing any 135mm frame to be converted to fixed.
5. What are the advantages of a VeloSolo bolt-on cog?
- An end to the possibility of damaged hubs, seized cogs and stuck lockrings.
- You can change a cog with one small torx or hex key - no bulky chain whips or lock ring wrenches needed.
- It gives a 100% solid mount - six M5 hardened steel bolts give the stiffest most secure interface possible. Zero slippage or movement possible, simply 100% power transfer - forwards or backwards.
- Allows precise dialling in of the chainline to match front and back, something that can be more difficult with a screw-on cog.
- Converts a mountain-bike to fixed in the easiest possible way. Flip the wheel round, bolt on our cog and ride. No other expense involved and reversible in a couple of minutes.
- Flexibility in set-up; left hand drive, dual fixed cogs etc.
- Compared to alternative bolt-on cogs that may be stamped or laser cut, VeloSolo bolt-on cogs are precision machined in the UK the old fashioned way from solid blanks of EN36 chro-moly to be perfectly round - sounds odd but not all cogs out there are as round as you might expect...
- After machining (teeth are milled on traditional hobbing machines), our cogs are heat-treated for strength and wear resistance, in addition they are reversible without affecting chainline for even longer life. The mounting holes are drilled to very tight tolerances to ensure perfect mounting on any standard 6 bolt disc hub.
- The VeloSolo cro-mo bolt-on cog is guaranteed for life to the original owner. If you wear out your original purchased cog we will replace it absolutely free of charge. See shop for details.

6. How does the bolt-on cog work?
It's very simple. Instead of using a thread on the centre of the cog to screw onto a matching thread on the hub, the VeloSolo cog bolts directly to the hub.
The majority of mountain-bike disc brake hubs use the ISO standard 6 bolt mounting. Instead of mounting a brake disc onto these mounting holes we manufacture a custom made series of cogs with the same drilling pattern. Thus our cogs simply bolt onto the hub in place of the disc.
As the cog is bolted (fixed) to the hub it can be driven by the chain forwards or backwards and becomes a fixed wheel.
For full details of set-up please have a look at the other FAQ's listed here.

7. So why do you sell traditional threaded cogs as well?!
For many valid reasons plenty of fixed wheel users are perfectly happy with the traditional threaded cog system. It has been around since the dawn of the bicycle and will always be hugely popular. There is an endless range of matching components available, both classic and new, including those from well known and much loved hub makers. For many riders the threaded cog has always worked perfectly. The bolt-on cog is an alternative system as well as one which allows mountain bikers an easier way to try fixed using their existing disc brake rear wheel.
We are happy to offer a very high quality UK made threaded cog to this market as well as a range of top quality cogs from other manufacturers. Our own Track cogs are made the old fashioned way exactly like our Disc cogs but this time from lightweight high strength 7075-T6 heat treated aluminium alloy. Teeth are hobbed and the cogs machined and anodized. The main thread is cut post-anodizing for a precise fit.
b) Can I run a fixed wheel on my bike?
1. Can I use a fixed wheel on my road/track bike?
All track frames and singlespeed specific modern road bikes (Specialized Langster, Kona Paddy Wagon, Surly Steamroller, Fuji Track, Bianchi Pista etc) use track dropouts. Most (but not all) older steel road bikes have horizontal dropouts. As long as your frame allows the wheel to be moved forwards or backwards to tension the chain you can run it fixed.
See also: Tell me about the various types of dropouts.
If your bike is a modern (probably aluminium or carbon) frame designed around gears and with vertical dropouts you will not be able to run it fixed. The exception is if such a frame has an eccentric bottom bracket (very unusual) or you use an ENO eccentric rear hub with disc mount. Oh, there is of course the final chance of finding a magic gear.
See also: If not, is there any way around this?

2. What if my road frame was designed around gears?
If you have an older road frame with horizontal dropouts designed to be used with gears the rear frame spacing will probably be 126mm or 130mm. Most of these older frames will be steel which can happily be squeezed in or out a few millimetres.
If spacing is 126mm use the set up as per a road/track frame with 120mm spacing and add another 3mm of spacers or washers each side (see shop) or you could squeeze the dropouts together as you tighten the wheel nuts - steel will not complain. Chainline in this situation will be the same as a 120mm spaced frame.
If spacing is 130mm on your frame then simply add another set of 5mm CNC spacers to the hub taking it from 120mm to 130mm. If a steel frame then another option is to use a 135mm mountain bike rear hub and spring the dropouts apart slightly. This gives the advantage of being able to use a flip/flop fixed/free set up. Chainline in this situation would be around 53mm so a longer bottom bracket or a mountain-bike chainset may be necessary.
If you have vertical dropouts see here too: If not, is there any way around this?
See also: How do I adjust my chainline then?
3. My mountain bike frame has track dropouts, horizontal dropouts or sliding dropouts. Can I run it as a fixed wheel?
Yes. More about dropouts here: Tell me about the various types of dropouts.
4. My mountain bike frame has vertical dropouts and I run it as a singlespeed using a chain tensioner. Can I make it into a fixed wheel?
No. You cannot use a singlespeed style chain tensioner with a fixed gear bicycle. See question below for further options.
5. If not, is there any way around this?
Yes, if you have vertical dropouts that do not slide then you may also have a frame with an eccentric bottom bracket (as fitted to the latest Santa Cruz Chameleon for example). If not you may be able to find a magic gear. Lastly there is the option of using an ENO eccentric hub with disc mount. Sheldon Brown has more on these various options.
6. How about if I am using traditional threaded track hubs and cogs?
All the information in this FAQ regarding frames and drop-outs and suitability for fixed applies just the same. A threaded track hub can be fitted to any frame spacing from 120, 126 or 130mm just by adding spacers to the hub axle in the same way as on the disc hub pictured below. Equal spacers are added to each side. For example to fit a 120mm track hub to a 126mm spaced frame simply add a 3mm spacer each side. Chainline will always remain the same (normally around 42mm with threaded hubs) regardless of frame spacing.

7. I'm not interested in fixed, I just want a 'normal' singlespeed - how do I convert my bike?
This is usually very quick and simple to achieve with little outlay. If desired, you can buy a specific singlespeed wheel with screw on freewheel but your normal cassette wheel is in many ways preferable. It involves little extra expense, allows simple and precise chainline set-up, provides an instant return to gears and unless you pay for a very high quality freewheel usually has a better freewheel mechanism.
Firstly you will need to replace the cassette of cogs (maybe 6, 7, 8, 9 or 10) with a spacer kit and a full height tooth single cog such as those supplied in our shop. You can use an old 'ramped' cog from a cassette but a dedicated SS cog will perform much better. Measure your front chainline (see questions above) for the front ring you will be using and mount the rear cog using the various spacers so the front and rear chainline match within a mm or so. Secure everything at the back with a standard cassette lockring.
(If you have an older wheel with a screw on multi-speed freewheel (probably 5 or 6 speed) then you can usually remove this and fit a Shimano singlespeed screw on freewheel in it's place. However, this can be difficult to line up with a front chainring to obtain a satisfactory chainline).
For the front chainset you can buy a dedicated singlespeed chainset but a double or triple with the surplus rings removed works just as well. As with the rear cog a full height tooth, non-ramped chainring is a much better idea than a typical geared chainring with it's cut down teeth, ramps and pins. As for ratio, the typical starting point for most singlespeeders off-road is a 2:1 ratio, so 32/16 or 36/18 or similar. For on-road work a more typical ratio might be slightly under 3:1 so 45/16 or 48/18 or similar
The only thing left to do is to tension the chain. As with the questions above this will depend on the sort of frame you have. If you have horizontal or track drop-outs you simply move the wheel forward or backwards to achieve the correct tension (around 1/2" deflection or so in the middle of the run). If you have vertical drop-outs (see questions above for more on drop-outs) you will need a simple singlespeed chain tensioner. This acts in a similar way to a derailleur to spring load the chain. These are available from our shop in normal sprung or specially modified un-sprung. See also: Tell me about singlespeed tensioners. A possible alternative (and usually slightly un-reliable) way to tension the chain is with a 'magic-gear' - see question/link above.
That's about it - throw that heavy cassette, old gear levers and other clutter in the parts bin and enjoy the immense pleasure of peaceful, efficient singlespeeding bliss!
c) Set-up questions:
1. Which (drilled cog) hub/set-up is best for my singlespeed road/track bike?
First ensure you can run a fixed wheel with your frame - see above.
Yes? OK - frame spacing, this determines the best choice in hub. The most common spacing on track and SS specific frames is 120 mm. This is the modern standard that virtually all track frames and single speed road bikes are made to.
By far the best choice for a hub to utilise a VeloSolo bolt-on cog is a mountain bike front disc hub, specifically a Shimano M756 disc hub or similar. Why this hub? See question below: Use a Shimano hub?! On my fixie?!
In short the hollow QR axle can be replaced with our custom solid axle and spacers allowing the hub to fit perfectly into the standard rear track/singlespeed road frame width of 120 mm.
Normal chainline on a track/singlespeed road bike is approximately 42mm. A cog mounted on a disc hub as above will give a chainline of approximately 41 mm. It is a simple matter to add spacers or washers between cog and hub to dial in the chainline perfectly to exactly match your front chainset. For instance adding a 1mm spacer makes your chainline 42mm, adding a 2mm spacer will make it 43mm.
If you are not concerned about using a track chainset or keeping the 42mm chainline then a superb alternative set-up all round is to use the same M756 hub but place a 5mm spacer on the drive-side and a 15mm spacer on the non-drive side (see pic below). Not only will this give you a non-dished wheel it will give a chainline of approx 46mm. This matches perfectly the outer ring position on a standard road chainset (46mm). Thus a world of second-hand or new road chainsets and bottom brackets from Campagnolo, Shimano etc becomes usable.
If you have an older road frame with horizontal dropouts designed to be used with gears the rear frame spacing will probably be 126mm or 130mm. Most of these older frames will be steel which can happily be squeezed in or out a few millimetres.
If spacing is 126mm use the set up as per a road/track frame with 120mm spacing and add another 3mm of spacers or washers each side (see shop) or you could squeeze the dropouts together as you tighten the wheel nuts - steel will not complain. Chainline in this situation will be the same as a 120mm spaced frame.
If spacing is 130mm on your frame then simply add another set of 5mm CNC spacers to the hub taking it from 120mm to 130mm. If a steel frame then another option is to use a 135mm mountain bike rear hub and spring the dropouts apart slightly. This gives the advantage of being able to use a flip/flop fixed/free set up. Chainline in this situation would be around 53mm so a longer bottom bracket or a mountain-bike chainset may be necessary.
Some older track/Keirin frames use 110mm rear spacing. In this case just use a 5mm spacer each side. Chainline will be approx 41mm, or place both 5mm spacers non-drive side for a 46mm chainline. For more on spacing the hub see also: Tell me more about frame spacing and Tell me more about wheel dishing.

2. Which (drilled cog) hub/set-up is best for my mountain bike ?
First be sure you can run a fixed wheel on your frame. See above questions.
Yes? Great - the route to fixed is easy. The rear spacing on virtually all mountain bikes is 135 mm. The best set up is a normal rear cassette hub with 6 bolt disc mount - you probably have one of these on your mountain bike right now.
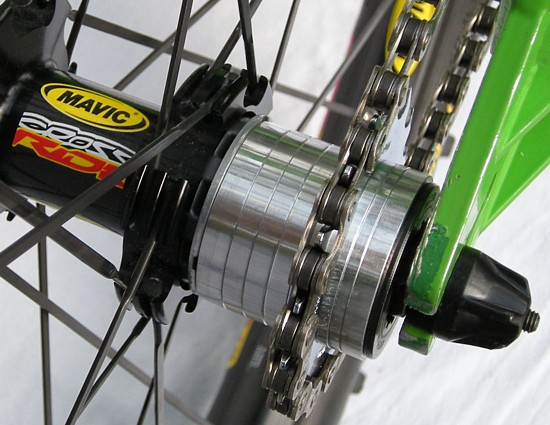
By mounting a drilled cog on the disc mount and a normal singlespeed cog and spacers on the freehub side you have a flip/flop fixed/free wheel (see pic below). As simple as that, no alterations are necessary and the wheel can be used with gears again simply by removing the singlespeed cog and mounting a cassette.
Using a cassette wheel with a single cog and spacers allows the chainline on the freehub side to be adjusted to match the fixed side perfectly. Thus when flip/flopping the wheel your chainline stays spot on. A cog mounted on the disc side will in most cases give a near perfect chainline with the outer front ring.
Or use a standard mountain-bike singlespeed (ie screw on freewheel) 6 bolt disc hub.

3. Tell me more about chainline.
On a singlespeed or fixed wheel bike you want the chain to run in as straight a line as possible. Ideally the two measurements; from the centre of the frame (at the seat tube) to the front chainring and again from the centre of the rear dropouts to the rear cog should be within 1 or 2 millimetres of each other.
This measurement is your chainline front and back. Standard chainline measurements are as follows:
- Track and singlespeed road = 42mm
- Road double inner ring /outer ring = 41mm/46mm
- Singlespeed mountain bike = 54mm
- Mountain bike triple; middle ring/outer ring = 48-50mm/52-54mm
These are standard measurements but in practise chainline often (nearly always) varies from these numbers and is rarely spot on front and back. Always measure your own chainline to be sure. See Sheldon here for how to and more on chainline.

4. So what will my chainline be if using a cog mounted on a disc hub?
Chainline will be as follows:
- M756 disc hub converted to fit on rear of road bike with 10mm spacer each side (slightly dished wheel) = approx 41mm
- As above but with 5mm spacer drive side, 15mm spacer non-drive side (non-dished wheel) = approx 46mm
- Bolt on cog to rear disc hub on a 26"/29er mountain bike = approx 53mm
5. How do I adjust my chainline then?
Compare the measurements in questions 3 and 4 above - simply add 1mm or 2mm spacers between hub mount and cog to create a perfectly matched chainline with the chosen chainset. If using traditional threaded track cogs you can mount spacers between the cog and the shoulder of the hub, please see track cog section of the shop.
There are other ways - use a longer/shorter bottom bracket (BB) spindle or spacers on the BB cups. Use a different chainset or mount the chain ring in a different position.

6. Tell me more about frame spacing.
Frame spacing is simply the distance between the inner face of the rear dropouts. Common measurements are as follows:
- Track, singlespeed road frames and some old 5 speed frames = 120mm
- Some older track/Keirin frames = 110mm
- 6 and 7 speed road frames = 126mm
- Modern 8/9/10 speed road frames = 130mm
- Mountain-bike 26" and 29er frames = 135mm
As always see Sheldon for more on frame spacing.
7. Tell me more about wheel dishing.
If you space a M756 disc front hub (100mm spacing) with 10mm of spacers each side to fit on the rear of a road frame then the chainline will be approx 41mm. The wheel will be slightly dished due to the disc mount.
If you want a non-dished wheel simply add a 5mm spacer to the drive side and 15mm (10mm + 5mm) on the other side. Chainline will be approx 46mm.
A road double chainset with just one ring in the outer position works brilliantly here as the normal chainline for this is 46mm. This also gives you access to endless options of chainsets and plenty of superb value second-hand Campag lovelyness on ebay.

8. Tell me about the various types of drop-outs.
There are three main types of rear drop-out with many minor variations: vertical drop-outs, horizontal drop-outs and track ends.
Most older road bikes and much older mountain bikes have horizontal dropouts, most newer road and nearly all modern mountain bikes use vertical dropouts.
Singlespeed specific bikes (road and mountain) mainly use track ends but you will also find sliding or adaptable dropouts on many singlespeed mountain bikes of recent years. Pictured below are the three common types of drop-outs, see Sheldon's site for more.

9. Use a Shimano hub?! On my fixie?!
Hey, we love Campagnolo etc as much as the next man, and use it wherever we can. However, you have to hand it to the big 'S', if you want an excellent quality strong hub, that is affordable, adaptable, easily serviceable anywhere in the world, will roll and roll for years and converts to fit a bolt-on cog to a road bike in minutes then XT's legendary M756 hub is perfect.
The M756 XT hub has double seals, superb user servicable bearings with borozon polished races and is wide bodied and high flange to build into a strong, stiff wheel. Importantly it also takes a 10mm axle, thus, the hollow QR axle can be replaced with a solid axle to take track nuts.
This allows custom spacers to be added each side to take the hub width from the standard front wheel width of 100mm to the standard rear track/singlespeed frame width of 120mm. More spacers can be added to custom fit the hub exactly to your particular frame, be it 110mm, 126mm or even 130mm.
If you really dislike the Shimano name then our lovely special order polished hubs make the XT logos barely visible. Check the pics in the shop and gallery to see how 'factory' the various converted hubs look.
10. Do all normal threaded track hubs and cogs have the same chainline?
No. There is a rough standard of 42mm but due to variations in hubs and cogs you will find chainline with threaded track hubs and cogs can vary from 40mm to 46mm or more. The best information is on Sheldon's site, if you scroll down to this page a little to the chart; 'Fixed Sprockets and Single Freewheels' and look at the 'Chainline Center to Shoulder' on the hub chart you can see that the distance to the hub shoulder (against which the cog mounts) for common hubs varies from around 35mm (Suzue) to nearly 40mm (Goldtec). The similar chart shows the chainline for cogs varies from 5mm to 7mm. To find the actual chainline you add together the two measurements for the combination you are using. Thus a Goldtec hub with a 1/8" EAI cog would have a chainline of over 46mm. A Miche track hub with a 1/8" Campag cog would have a chainline of around 43.3mm.
Taking a VeloSolo threaded cog it has an overall width of 7.5mm with the shoulder on the inside. The tooth thickness (on a 1/8" cog) is 3.0mm. Thus the centre of the cog teeth (ie chainline) is 1.5mm from the outside or 6.0mm from the inside of the shoulder. To find out what the chainline would be on your hub add 6.0mm to the 'Chainline Center to Shoulder' hub dimension on Sheldon's chart above. The average is around 36mm giving a standard 42mm chainline. You can fine tune this by using spacers between the cog and hub shoulder as long as enough thread is available. Phew! Hope that all makes sense...
11. Any tips for installing traditional threaded cogs on track hubs?
To start with ensure all threads are perfectly clean; on hub, cog and lockring. Lightly grease the hub threads and start the cog by hand. If it does not go on with the lightest effort back off and start again ensuring it is not cross-threaded. Spin the cog right up to the hub shoulder and using a chain whip crank it up really tight. Repeat with the lockring and tighten securely with a lockring tool, remember the lockring has a left-hand thread and tightens anti-clockwise. To avoid slippage, hold the tool against the cog/lockring with one hand while tightening with the other hand.
Now go ride round the block and up a few steep bits cranking good and hard. You should find the cog has tightened up some more so you will need to re-tighten the lockring. Check it from time to time. Always use a well fitting tool to avoid damage to the lockring notches.
As well as the traditional method of installing cogs there is an alternative known as 'rotafix' - a Google search will bring up more on this. If rotafixing though take care not to over-tighten things.
12. Left-hand drive - what's that all about?
It's just something a bit different and that the bolt-on cog makes possible. BMXers' have been doing it for years. Easy to set-up but there can be an issue with the pedals trying to unscrew as they are now threaded the 'other' way round to normal, a drop or two of Locktite and regular checks should solve that. Please see the gallery for some LH drive set-ups.

13. Can I use the bolt-on cogs for a double-fixed (Surly 'Dingle' style) set-up?
For our dedicated page on this please check; dual VeloSolo Disc cog set-up.

d) Other technical and miscellaneous questions:
1. Do I have to fit a rear brake?
In most countries two brakes are legally required. If riding a fixed wheel this counts as your rear brake (using the resistance in your legs to stop the pedals and wheel turning).
Some prefer to have a separate rear brake too. Many run without a front brake altogether, the choice is yours.
2. If I bolt a cog to my disc mount how do I use my rear disc brake?
You cannot do both (except with a big dose of ingenuity - see pic below). Most mountain-bike frames still have rim brake mounts ("V", cantilever or caliper brake) so you can of course still run a rim brake in fixed or freewheel mode.
If your frame is disc only then in fixed mode the fixed wheel acts as your "brake" anyway. See question above.

3. Tell me more about using a QR on a fixed wheel.
Some say yay, some say nay. Many people use QR's on off-road fixed wheel bikes with no problems.
Important thing is to use a decent steel one, this is no place for lightweight Ti skewers. Stick to a reliable Shimano skewer cranked up good and tight.
4. Can I use a 1/8" chain with a 3/32" cog?
Yes. A 1/8" chain (wider) can be used on a 3/32" (narrower) cog but it will have a bit of 'slop', best to match like for like. You cannot use a 3/32" chain on a 1/8" cog. Remember also that many 3/32" singlespeed and fixed cogs are too wide for certain 9 speed narrow chains. 10 speed chains are a definite no no. Note: our 3/32" cogs are for use with traditional 7 or 8 speed chains not narrow 9 or 10 speed chains.

5. What is a magic gear?
This is a clever combination of front chainring, rear cog and chainstay length (effectively distance between the two rings) that allows the perfect length of chain to give correct chain tension on a frame with vertical drop outs. Sheldon has more on magic gears here.
6. Is using a cog on a disc mount a good idea?
Well, consider an eight inch travel full-suspension off-road bike, piloted down the side of a mountain by a pro downhill rider. The front (and/or back) disc brake happily take the strain of hauling this 40lb+ bike (and rider) to a stop with a six pot hydraulic calliper straining on an eight inch disc.
Now there are some strong fixed wheel riders out there but in comparison a 'fixer' twirling the pedals on a cog mounted in the same way or using as much braking/skidding force as desired is producing much less stress on that same mount.
Our cogs are precisely machined with closer than normal tolerances for the mounting holes. This ensures the bolts locate tightly and perfectly in the mounting holes with no 'slop'.

7. How about using a front mountain bike hub on the rear of a road bike?
The XT M756 hub as recommended for bolt-on cog conversions has the same 10mm axle as any rear hub and large strong flanges, the hub body is also far more substantial than a typical skinny road hub.
Distance between flanges on the M756 is 55mm - that's wider than those on a normal MTB rear cassette disc hub and equal to or wider than most typical rear road cassette hubs.
Bearings in a M756 front hub are 3/16" but Shimano fit 20 of them running on high quality borozon polished races. For many years Campagnolo used 7/32" bearings (1/32" bigger than 3/16") on the drive side of rear hubs.
As with the question above, XT front hubs are happy clattering down a mountain on a rigid or suspended mountain-bike. On the rear of a fixed wheel road bike they work superbly, this is backed up by practical experience in use.
8. How do I fit a solid axle and spacers to my Shimano hub?
You will need a pair of the correct size cone spanners with very thin jaws - Shimano use very narrow flats on their cones. First remove the rubber seals (on M756 hubs). Remove the outer locknut from one side of the axle, unscrew this followed by the cone. Withdraw the axle carefully and remove the other locknut and cone noting any thin washers fitted.
Onto your new solid axle loosely screw on the first cone followed by the original thin washers if fitted, appropriate spacer(s) and lock nut and insert axle into hub. Re-grease bearings if necessary.
Repeat on other side and adjust position of cones to give correct axle protrusion each side for your set-up. Adjust bearings correctly and tighten locknuts as normal. Finally slide/squeeze rubber seals over axle and spacers until they pop into place.

9. How do I fit the cog to my disc hub?
Position cog over disc mount, adding any spacers between if required. It's a good idea to add a smear of grease between cog and mount face. Loosely screw in the six bolts (using locktite, thread prep or grease as appropriate).
Make sure torx or hex key is fully inserted in bolt head to avoid slippage and tighten down bolts loosely in the following clock face pattern: 10, 4, 8, 2, 6, 12. Repeat a couple of times increasing the torque as you go round until the bolts are fully tightened. Reverse process to change or remove cog.
10. Which bolts should I buy to secure the cog to the hub?
Originally, disc hubs always used hex (allen) key bolts with socket heads. Torx button head bolts are now sometimes fitted. These are neat looking but do be careful to always ensure you use a good quality Torx tool and it does not slip. Standard Torx bolts can be difficult to remove if the head becomes ruined. We specify our bolts with a large deep head for excellent tool location and easy removal.
As for material, we mainly stock and recommend high-tensile steel bolts. Having said that, we all love shiny things so we also stock Torx head bolts in high-spec A4 Stainless Steel.
Remember though that compared to high-tensile steel, stainless is weaker and can be prone to seizing (galling) in aluminium and stretching. If using stainless steel in aluminium hubs always use a thread prep or lube.
All our steel hex bolts are the very highest grade 12.9 high-tensile steel for ultimate strength.
As a general rule choose 10mm or 12mm for disc brakes, 12mm for disc cogs and 15mm if planning to use extra spacers. (The 20mm bolts are really just for dualcog use). The longer bolts allow for more spacing washers but make sure the bolts you choose will not be too long for your hub and butt up against the spoke flange. Washers can also be placed under the bolt head to prevent this.

11. Tell me about singlespeed tensioners.
With vertical drop-outs, no eccentric BB or hub and no magic gear then a chain tensioner is what you need to get the chain tension on a singlespeed spot on. It replaces the rear derailleur and pushes against the chain to take out any 'slack' and provide a smooth drivetrain.
Some tensioners are sprung like a rear mech, others are moved until they push against the chain to set the tension just right and are then locked in place. The tensioners we sell spring downwards to tension the chain but they can be modified to be non-sprung and able to be locked in place (see below).
The tensioners should be trouble free to fit and are very robust and difficult to damage in normal use but it is important to make sure they are fitted correctly. If in doubt always seek the advice of an experienced or professional mechanic.
First make sure your front and rear chainline is matched to within a couple of mm's. The spring tension is always pushing the chain down - make sure when fitting that this is the way the tensioner is trying to turn - do not fit the tensioner and try and turn it round one rotation or similar that may put extra strain on the spring and cause damage. Please be sure not to overtighten the adjustment bolt that clamps the jockey wheel spindle. We regret we cannot accept warrany claims for items that have been incorrectly installed or over tightened.
Fit just like a derailleur so when facing the frame the peg on the mounting assembly is to the left and clear of the frame dropout tab, tighten the mounting bolt (grease this) and then rotate the tenioner anti clockwise and the tab will rest against the frame tab. This is the metal stop on the frame hanger where the 'B' tension screw on the mech would normally go.
The tensioner needs to be in the correct position against the drop out so that when tightened in place it is rotated against the tension in an anti-clockwise position while fitting and when released it then pulls the chain downwards.
ALWAYS fit/size the chain (length) to the tensioner do not over-rotate the tensioner to try and make it fit the chain if too tight.
Pivot the tensioner round and adjust the movable jockey wheel so it is exactly in line with the chain. Always make sure the alignment is correct and the jockey wheel is in line and not twisted. Turn the bike upside down and sight 'through' from the rear of the bike ensuring the chainline between the rear cog, tenioner jockey wheel and front chainring is perfect. If it is not this will lead to excess noise and skipping or jumping or even derailment of the chain.
The metal chain guide loop can be used but it is not really necessary - removing it allows the tensioner to be used with 1/8" chains and makes the whole set-up less fiddly for chain maintenance etc. Note: pic shows tensioner on a horizontal drop-out frame, normally these are used only with vertical drop-outs.
If desired the tenioner can be converted to push up type (pic below) which can offer better performance as the chain is pushed up against the cog rather than pulled down.

To convert the tensioner to a fixed push up type: Remove the circlip from the back of the mounting bolt, remove the spring.
Reassemble without the spring and with a second washer the same size as the first under the bolt head. This will allow the tensioner housing to press against the frame and lock in place. Make sure the circlip is tight.
Mount tensioner as above (for sprung version) but making sure tensioner pushes chain up against the cog with reasonable pressure and then tighten mounting bolt.
See pictures: pushing up; un-sprung (above pic) and pushing down; sprung (below pic).

12. What is a (chain) half-link?
If you need to shorten a chain the links have to be removed two at a time as they fit together in pairs of 'male' and 'female'. This means a chain can only be shortened in 1 inch chunks at a time. A half-link combines this pair of links into the same space as one link allowing smaller chain length adjustments for fine tuning. This is especially useful when needing to positon the wheel exactly in the frame or struggling to find a 'magic'gear'.
To sum up, the half-link allows the wheel to be moved back by just 1/4 inch at a time. We sell various half-links in the shop in both 1/8" and 3/32" sizes. Choose from male to male and male to female links.

13. How do I know what BCD my chainring is?
BCD is Bolt Circle Diameter which is a measurement of the diameter of the circle that the mounting bolt holes describe. There are many various BCD's in use but the common ones are as follows;
- Modern 4 bolt Shimano MTB chainsets (not XTR) = 104mm
- Standard road double middle/outer (Shimano and others) = 130mm
- Modern Campagnolo road double middle/outer = 135mm
- Older Campagnolo and some track chainsets = 144mm
There are many others of course, especially in MTB chainsets from the last 20 years. It is easiest to check your BCD by measuring from the centre of one bolt hole to the adjacent one and comparing it to a chart such as the one at Sheldon's site here: Sheldon on BCD.

14. Why do chainrings need different length bolts?
On a mountain bike triple or road double the middle and outer rings use the same bolts to secure the rings to the chainset. If you want to remove one ring (to convert to singlespeed) you will find the bolts (actually inner 'nuts') are now too long preventing them tightening properly. There are two solutions - either add some chainring washers to space out the bolts or use shorter bolts.
Sometimes 'single' chainring bolts will be too short when converting to SS and normal 'double' bolts will be too long. Typically this occurs when mounting a middle chainring on the outer position of a chainset (for a neater appearance or to change chainline). As the bolt recess on the chainring is now on the 'wrong' side single bolts are too short and double bolts are too long. Say you have a Campag double road chainset and want to move the inner 39t ring to the outer position - the original bolts will be too long - simply add a 0.6mm spacer behind each inner part of the bolt (ie the 'nut') on the inside of the ring and you will not need a new set of bolts.
Variations in thickness and depth of different manufacturers products, ie chainrings, crank 'spiders' and chainring bolts means that certain combinations will require different chainring bolts or chainring washers to achieve an ideal fit. If unsure please email us for advice.
VeloSolo chainrings have deep recesses for the bolt heads - when fitting our rings the best bolts to choose are often the Zenith as these are less deep than Stronglight or other makes, however, this does depend on the crank arms in use. Again, as above if in doubt please email us to check.
Therfore the combined thickness of material (taking into account the countersink in each part if applicable) of your chainring/crank spider mounting hole depth would need to ideally be around 0.5 to 1mm larger than this measurement to give the best fit. If the bolt is longer then the two parts will not tighten fully, if too short then not enough of the chainring will be supported.
The diameter of the slotted nut head is standard at 12mm. The inner bolt diameter is 10mm.
Note: if mounting a single VeloSolo chainring on the opposite side to normal on a crank (ie outer position on a MTB chainset or middle position on a road chainset) then double bolts are the ones to use and will not require washers as the VS rings are thicker than normal. However, chainring washers are still very handy little things to have in the toolbox.

15. Tell me about bottom brackets, tapers and BB lengths.
If you are used to mountain bike bottom brackets then you may be surprised that there are two different bottom bracket tapers on road and track bikes. Shimano and most other common Japanese component manufacturers use the JIS taper (remember J = Japan). Campagnolo and Miche (both Italian) use the ISO (remember I = Italian) taper. However, some Japanese track chainset manufacturers also use ISO confusing the whole issue.
Both tapers have the same angle but the length of the taper differs meaning that the two are not strictly interchangable. Compared to ISO on ISO and JIS on JIS, an ISO chainset will mount a few mm's less onto a JIS BB, a JIS chainset will go on a few mm's more onto an ISO BB. Many cyclists interchange the two without issue but for best performace stick to the right pairing. Have a look at Sheldon too for more on ISO vs JIS.
One question we get asked nearly every day is 'Which BB length do I need for my bike'? This is always difficult to answer and depends on so many variations - chainline required, frame design, chainset model, BB model, ISO/JIS taper etc. Manufacturers will often issue guidelines as to the recommended BB length for a certain chainset to give an approximate chainline. However, this is indeed a guide, nothing more - different tolerances in taper for the crank and BB from different manufacturers will ensure that nothing is certain.
Our advice is to check your chainline at the rear (note this) and then calculate the probable required BB length from the manufacturers guidelines. Thus if your rear chainline is 44mm and the guide says a 103mm BB gives a 42mm chainline then you may need a 107mm BB (ie 2mm longer each side) to give 2mm more on the drive side. Alternatively, try your chainset on an existing BB of known length and work from there. See section 'C' above for more on chainline. And please see Sheldon here for lots more general BB info covering various types of BB and thread sizes etc and here for more on choosing BB lengths.
For a comprehensive guide to BB sizing and fittings, please see Sheldon here.

16. Any advice on gear ratios and chainring/cog sizes?
Firstly, gear ratios are always personal and depend on local terrain, style, ability etc. If you are moving from a geared bike to a singlespeed or fixed the ideal option is to ride a typical route in your local area sticking to one gear that 'feels' right (without changing gear). If it seems too easy/hard repeat sticking to the next gear up or down. Once you have found the ideal compromise use the gear calculator below to replicate this gear on your singlespeed/fixed.
Here are some general pointers; for singlespeeding off-road the traditional starting point has always been a 2:1 ratio, ie 32 chainring and 16t cog or similar. It does not matter how you achieve this, 32/16, 36/18, 44/22 all give the same gear. The more teeth the less wear and some believe larger rings/cogs give a smoother drivetrain. However, smaller chainrings give better clearance off-road. If you live in a hilly area you may need to use a slightly lower (easier) gear, ie 32/18 or similar - especially in UK winter mud. For road use with a mountain bike a higher ratio such as 36/16 would be a minimum if you do not want to be 'spinning out' too easily.
For fixed wheel or singlespeed road/track bikes on tarmac higher gears from 2.5:1 up to around 3:1 ratio are in order. It is easier to think in terms of gear inches to compare gears. Gear inches are calculated by dividing the front chainring by the rear cog and multiplying by the wheel diameter (roughly 27" for a 700c road wheel). Thus a road bike with 45/18 ratios would have a 68" gear (45 divided by 18 = 2.5 x 27" = 68" approx). The normal recommended range of gear inches on road is around 65" to 80" depending of course on how hilly your area is. Something around 70" is a great starting point for typical use in a flattish UK city. You don't want to go too low and be spinning like a lunatic downhill or too high and busting your knees going up hill.
Here are a few more examples of other road ratios/gear inches; 45/19 = 64", 44/18 = 66", 45/18 = 68, 48/18 = 72", 48/17 = 76", 45/15 = 81", 48/15 = 86". Sheldon has an excellent gear calculator on his website.
17. How do I fit bars to quill stems without scratching them?
For our dedicated page on this please check our blog bar fitting article.

18. Tell me about the various handlebar and stem sizes.
As with many bike components it is definitely not a case of one size fits all. Road bike, mountain bike, BMX - all have more than one bar and stem size together with a variety of fork steerer sizes making for a lot of combinations. The majority of mountain bikes now use the common 1 1/8" size with a clamp on ('A-Head') stem and non-threaded steerer. The smaller 1" and quill (expander wedge type for threaded steerer) stems have largely become obsolete and only to be found on many a 'retro' build. The common handlebar diameter for mountain bikes is 25.4mm with the oversize 31.8mm becoming ever more popular.
Older steel road frames typically used for fixed wheel and singlespeed conversions have a threaded steerer and require a 1" quill stem. More modern road bikes and most off the peg fixed wheel bikes now use a 1 1/8" clamp on ('A-Head') stem with non-threaded steerer.
Again within these two common sizes there are also variations in the handlebar clamp diameter. Modern stems are simpler with most using a 26.0mm or 31.8mm clamp. Older 1" quill stems generally use a 25.4mm clamp or 26.0mm on more modern models. However, Cinelli make the most popular older stems and bars and they have their own standard of 26.4mm. All these are nominal sizes though - the bar is a fraction smaller than the stem to fit into the clamp. Measuring a variety of Cinelli 26.4mm bars in our workshop they vary from 26.20mm to 26.35mm. Similarly Cinelli 26.4 stems vary too especially when they have been 'opened' and 'closed' many times.
So, can you mix the handlebar sizes? Firstly, the ideal fitting is one perfectly matched to the other - A Cinelli '26.4mm' (nominal) bar in a '26.4mm' stem etc. But with the aid of shims or otherwise bars and stems can be mixed to a degree. A 25.4mm bar can be fitted to a 26.0mm stem using a Nitto shim for example. You can 'make' shims from aluminium cans but the real thing is better. A 26.0mm bar is quite often usable with the thinnest 'coke-can' shim in a Cinelli 26.4mm stem.
We make our own Squeeze bar in two sizes of 25.4 and 26.4mm. The latter to fit Cinelli stems but it may be usable with some 26.0mm stems that have a removable or hinged front clamp (or even some older 'split' single bolt types). If in doubt, measure your own stem opening and email for advice. In general, the most important thing when fitting bars to a 'split' (single bolt) clamp, eg Cinelli 1A or XA stem, is to remove the clamp bolt and very gently open up the clamp a fraction with a soft-edged tool while at the same time sliding the bar in. Failure to do this will inevitably lead to horrble scratches on your lovely new bar! See the blog bar fitting article for more. Sheldon has lots of handlebar and stem fitting info on his website.

19. Which brake lever fits which bar?
This is one of the most common questions we get asked every day so it's about time we put a guide here. There are many variations in bar dimensions and where levers will fit - due not just to the various diameters and types of bar but also the bulges, sleeves and transitions in the clamp and grip areas etc.
In addition some levers not designed for certain bars can be fitted with the use of shims. These may be supplied with the levers (Dirt Harry) or home-made from Coke cans, cut-down headset spacers, plastic tubing etc.
To list the various levers we sell to start with and their clamp sizes (ie the diameter of the tube they are designed to fit around (or within for the 188):
- Tektro RL720 = 24.0mm
- Tektro RL721 = 31.8mm
- Tektro RL726 = 26.0mm
- Dia Compe 77 = 22.2mm
- Dia Compe 99 = 25.4mm (and 22.2mm with supplied pair of shims)
- Dirt Harry = 25.4mm (and 22.2mm with supplied pair of shims)
- Dia Compe 188 (fit inside bars) = 19.8mm minimum.
- R100A levers (fit curve of drops = 23.8mm to 24.2mm
Last ones first as this is easiest - the 188 levers are designed to fit inside the ends of time-trial, cut down up-turned drops or bullhorn bars - ie the Nitto RB-018. As long as the ID (inside diameter) of your bar is suitable they will fit. Drop bar levers are of course designed for the curves of traditional bars although some riders use them on the ends of up-turned drops. Again as long as the OD of the tube is suitable they will fit.
Next, the 77, 99 and Dirt Harry; whatever the stem fitting may be on various MTB bars (flats, risers etc) and BMX bars (ie 22.2/25.4/31.8 etc) the grip area is always 22.2mm. So you can use any normal BMX or MTB lever including the Tech 77. The Dia Compe 99 or Dirt Harry levers will also fit by using the two supplied shims.
Our own Squeeze bars are different as the 'grip' area is the same as the clamp area. We make the bars in three sizes of 25.4, 26.0 and 26.4. For the 25.4 the best match would be the Tech 99 or Dirt Harry or the Tektro RL726 with a home-made shim. For the 26.0 Squeeze bar use the Tektro RL726. For the 26.4mm bar the RL721 is usable with a home-made shim or the RL726 will reach around with a little persuasion.
If you want to fit a lever to the tops of drops then here are some tips: for the sleeved areas on a 25.4mm, 26.0mm or 26.4mm drop bar (Nitto, SR, Saba, Cinelli etc) then see the respective Squeeze bars as above. The non-sleeved top area on all these bars is around 23.8mm so the RL720 is ideal or the Dirt Harry can be fitted by just using one shim.
Bullhorns like the RB-018 have a wide bulge of 26.0mm that tapers down to 23.8mm. Therefore many levers are usable including the RL720, RL726, 99 and Dirt Harry depending on the position required on the bulge, top or along the taper. Finally, only fitting that the last word on this FAQ should go to good old Sheldon who as always has all the various fittings listed on his website.
20. 'Cog'?? You mean 'sprocket', right??!
Yes, we know, we know! A 'cog' is a toothed gear wheel or similar that meshes with another toothed wheel. The rear toothed wheel driven by a chain on the back of a bicycle is a 'sprocket'. And as a manufacturer of drivetrain components we really should use the correct terminology. However, rightly or wrongly (OK, wrongly) 'cog' enjoys pretty common usage amongst riders these days, rolls off the tongue better than 'sprocket' and well, takes up much less space on an eBay listing title. We know using the wrong term offends some people and for that we apologise.
21. What is 'Boost'?
In brief it is just a marketing name for wider spaced hubs. For thirty odd years MTB's used the same standard spacing: 100mm front, 135mm rear with a simple QR skewer to secure the wheel. With the move to larger wheels, wider tyres and wider cassettes & the need for a more secure fixing system the newer standard became 100mm front (as before) but 142mm rear with the use of 15mm (front) & 12mm (rear) thru axles. We now have another additional wider 'standard' (Boost) with 110mm front spacing & 148mm rear spacing still using the same thru axles. Super Boost (SB) is yet another newer standard although much less common than regular Boost. SB keeps the front at 110mm but rear spacing is increased to 157mm.
Things are slightly complicated by the fact that Boost (unlike the change from 135mm to 142mm) uses wider hub flanges & moves the brake disc & cassette mounts each 3mm further out from the centreline of the hub. For the front wheel this is simple: just add a 5mm spacer each side & a 5mm spacer to the disc mount, no re-dishing required. The spacers slide onto the thru axles & are secured when this is tightened. However, for the rear to fit a non-Boost 142mm wheel into a 148mm Boost frame or a 148mm Boost wheel into a 157mm Super Boost it is slightly more complicated & can be done in two main ways.
1). Add a 3mm (4.5mm SB) spacer each side of the hub leaving the wheel central in the frame & requiring no re-dishing to the wheel. You then add a 3mm (4.5mm SB) spacer to the disc brake rotor keeping this in the correct place for the brake caliper on the Boost frame.
2). Add 6mm (9mm SB) of spacers to the non-drive side of the hub requiring the wheel to be re-dished 3mm (4.5mm) over to the non-drive side to keep the rim central. You then need to add 6mm (9mm SB) to the disc brake rotor to keep this in the correct position.
Advantages/disadvantages? #1 is cheaper & much simpler but does mean that the cassette is 3mm (4.5mm SB) further to the non-drive side which affects chainline slightly (more noticeably with SB) & may need spacers added or changes to the front chainring or BB position to improve drive & gear shifting. In practise it is generally fine but please be aware of this. #2 means the chainline is unaffected but does require the wheel to be re-dished slightly, this is relatively simple & quick for any competent wheel builder.
Thanks for looking, once again do please email if you have any questions not answered here.
© VeloSolo ® 2024.